![]() This article will show you the basics of Samsung cartridges refilling process
This article will show you the basics of Samsung cartridges refilling process
It is not a call for action by any means. If you are commercial organization representative, we recommend you to address service instead of doing it by yourself. This will save you not only money, but also the time needed to examine the cartridge equipment, finding proper toner and repairing malfunctions that may appear during the refilling process. But, if you are Mr. Fixit, then you will find something interesting here.
This article will consider overhead questions about Samsung cartridge refill, nuances of the process and what should have your closer attention. This article should be interesting for those who want to save some money and refill the cartridge by themselves. So, let’s get started.
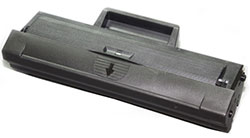 At the moment, refilling cartridges of this brand is quite popular. Every day, more and more printers and multifunction devices are produced by the Korean manufacturer: one may say that the number of models is growing like a weed. There’s nothing bad in it, it is rather good. Progress forges ahead, new hardware components and functions are added, and the design is being improved. But there’s also a negative side. The manufacturer fights for the profit and prevents users from re-using their cartridges in any possible way. And that makes users life more complicated. There are new undismountable cartridges, where support connections are not screws and bolts, but plastic rivets, which are holding cartridge components dead. You cannot do anything about them but to cut them off completely or remove them in some other way. One more refilling obstacle is cartridge chips installed by the manufacturer. Before, they were performing an informational function, notifying the user about running out of toner, and now they are blocking the device, making further printing impossible. Typical representative of afflictions described above is the Samsung MLT-D104S cartridge. It has both rivets and the chip. You can see it on the image. Let’s get things straight step-by-step.
 Let’s look at the refilling process using widespread Samsung cartridge for ML-1520/1710, SCX-4200/4220/4300 models as an example. All these cartridges are pretty much the same, except chipped SCX-4200/4220 and SCX-4300. The chip in first cartridges could be replaced or jailbroken, and with the second ones everything is much more complicated. Samsung made refillers life more complicated by installing the cryptoprocessor chip. And now the jailbreak or the chip replacement won’t help here. But thoughts are constantly developing, and Einsteins developed a way to avoid security. Now we don’t jailbreak the chip, we jailbreak the device itself. By changing the firmware, we’ve managed to make the device work without a chip! The security issue was solved. Now let’s get down to refilling this type of cartridges.
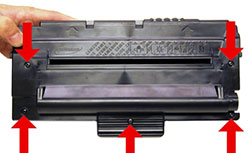 This Samsung cartridge may be considered as traditional. It is quite a space saver. Flat. If you look up closely, there’s a toner refilling cap on the cartridge side. But, by simply opening it and filling toner there won’t result in proper printing. So we won’t do it this way, we’ll make it right! And here’s why. This type of cartridges, use waste-free system, that means the toner that wasn’t printed on paper, goes back to the reservoir along with the paper dust and a whole other junk. And that’s why, to refill the cartridge we will be disassembling it. To do it, we need to undo five screws which are holding the upper lid and the cartridge base together. Pry up the catches and take it off. Now you see cartridge interior. Put the cartridge lid aside, we don’t need it for now. Let’s get to the cartridge cleaning.
First, flip the lower cartridge half upside down and shake everything out of it. Next, if possible, using the vacuum cleaner, remove all of the toner leftovers and junk that may have settled down inside of the cartridge. Next, cleaning the cartridge blade. It looks like shiny, metallic plate along the rubber roller. You need to clean the edge of the blade, which is in contact with the developing roller (big diameter rubber roller). You need to take it out or make a special cleaning tool. It is very simple. Take a beer can, cut out the rectangle 2 by 5 cm. Then, using this tool, carefully push it in between the blade and developing roller. Then, clean the edge of the blade by moving the tool along it. At this point, the blade cleaning is over. Pay attention, this is very important. If you don’t clean the blade, there may be thin unprinted lines on your prints, because of stuck toner. And also the print will be pale. We want to refill it nicely, right? So, don’t turn your tail upon the cleaning! Now we’re left with cleaning the smaller rubber roller – it is the charging roller. It is cleaned with the special liquid in maintenance shops. At home you may use just warm water with soap, or just warm water. Take it out and wipe it with the wet rag, so the color is even and there’s no whitish stuff left. You’ll see what I’m talking about when you’ll start wiping. After the cleaning it should look like the clean rubber with even black color. Next, you need to let it dry. Put it inside back. Now, take the side lid, takeout the cap, place the lid onto the lower half and clip it. Screw it back. Now, the final part – refilling.
 Let’s put off for a bit, and speak about what we’re going to fill our cartridge with. At the moment there is a great number of different toners. There is original toner from manufacturer that is issued in special refilling kits, perhaps it is the best option, but we won’t use it since it is simply expensive. What we want is to save some money and have nice results. We will use the compatible toner. I can advise you known-brands, such as Static Control, AQC, Fuji. But this choice is far from obvious, so I would recommend you to look at what you have in local shops, ask the shop assistant which Samsung toner has less negative feedback…
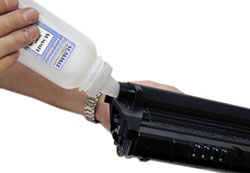
I hope you’ve bought the toner already. Let’s get to the final part of our tutorial. Do you remember taking the cap out? So, we will fill the powder through that hole. Take the toner bottle, shake it and fast your funnel. You should have bought it along with your toner, now you may make a paper one. And now, carefully, fill the cartridge up by 2/3, no more, since there is a toner mixer inside, let’s not prevent it from working and give it some space. Close the cap. That’s it! You may test it out now! I hope everything went just fine and the cartridge works perfectly.