What shall you do in case your printer stains the paper? Every user asks himself this question when faces this issue. There are a couple of possible solutions. One of them is to address service center, where you will be assisted in finding and resolving the problem. The second is to try repairing the problem by yourself or at least to find out what’s wrong with your printing buddy. We’ll go with the second one since it is interesting and what is more you will save some money.
Laser devices (printers, mfps) of various manufacturers are pretty similar in constructional parts and the structure itself. Thus, diagnostics and malfunction repair of different models is considerably simplified.
Let’s begin with the most common thing. If the printer smudges the paper during the printing, then it is possible that the problem is with your cartridge. You need to change it with a known good one. If the problem is gone, it means it was the cartridge. You need to buy yourself a new one or give your to be repaired and refilled.
The other possible reason of dirty paper is the printer malfunction. We’ll check it up with so called “Stop-test” method. So, what is it?
Run the device for printing, open up the lid or turn the power off when the paper will be passing under the cartridge OPC drum but is not yet in the fusing unit. In this way we’ll be able to exclude fuser malfunction. If there’s no dirt on the sheet at that moment, it means that the sheet is smudged in the fuser unit.
In the first place you need to pay attention to the condition of the thermo stencil or Teflon roller. If there are any defects or built up toner on the surface, then probably that’s the reason. Other possible reason is insufficient heating of these elements. You need to check the temperature sensor and its outside condition, probably there’s some baked toner. And so, you need to clean it off. Sometimes, smudging is caused by peeled casing of a rubber drum. It is not always possible to detect this issue visually, so you will have to disassemble the fuser unit and diagnose the roller after that.
The other reason is incorrectly set paper parameters. If the paper is thick and the parameters are set for the thin one, you can easily end up with underheating of the fuser unit, what will cause not baked toner and dirty paper sheet. It is also possible that the issue occurs due to the electronics of the device, but this is completely different level of repair.
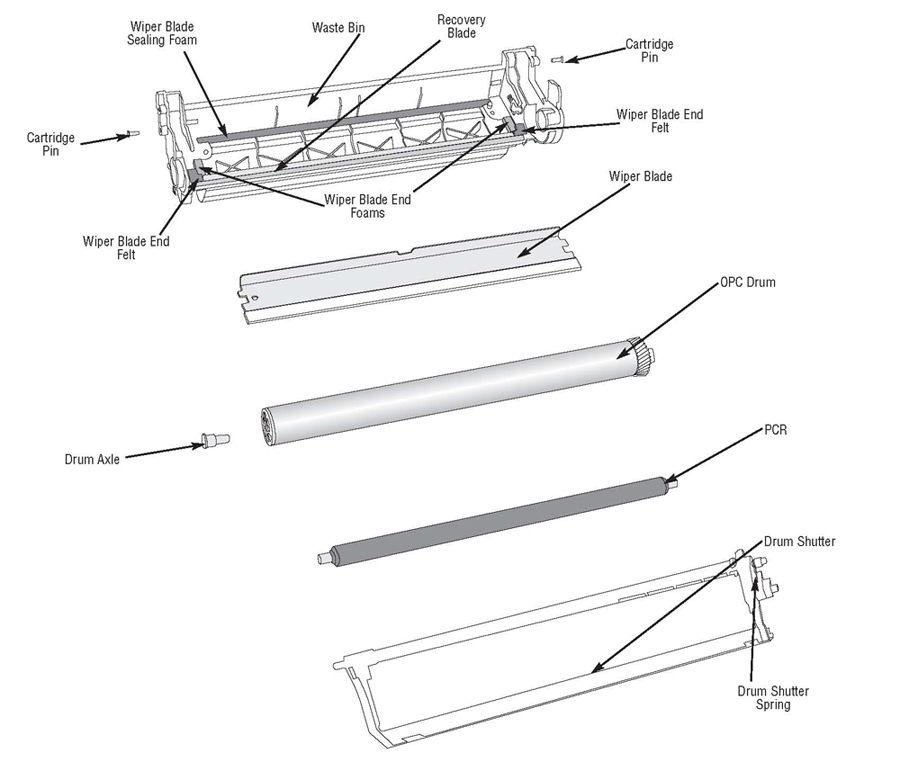
Few words about cartridge malfunctions. If you have repeated image, then the problem is with the charging roller or OPC drum. This issue may be as well caused by the bent wiper blade.
Black, horizontal lines are caused by damaged surface of the OPC drum. Also black lines are sometimes caused by poor contact of charging roller. You need to smear the bushing of charging roller with conductive grease.
Black, horizontal lines on the paper are caused by the damaged edge of the wiper blade. Damaged part of the wiper blade won’t clean the toner off the surface of OPC drum. Wiper blade needs to be replaced.
Thin, vertical blank lines are caused by built up toner on the edge of the doctor blade. The edge needs to be carefully cleaned or replaced.

Chaotic dots on your print are usually caused by toner dusting from wasted toner reservoir or new toner reservoir. In this case you need to check the condition of recovery blade and sealing blade. In case they are damaged, you need to replace them or replace the cartridge case.
Backgrounding or smudged paper is caused by the bad quality toner or full wasted toner reservoir. First issue is resolved by using high quality toner, the second one by disassembling the cartridge and cleaning the reservoir.
Also, you should not forget that printing equipment requires preventive servicing. You need to periodically clear out leftovers of toner and paper dust out of your device; otherwise, there’s a chance your device will simply stop working one day. Overall cleanness of printer or mfp guarantees long and trouble-free work of your equipment.