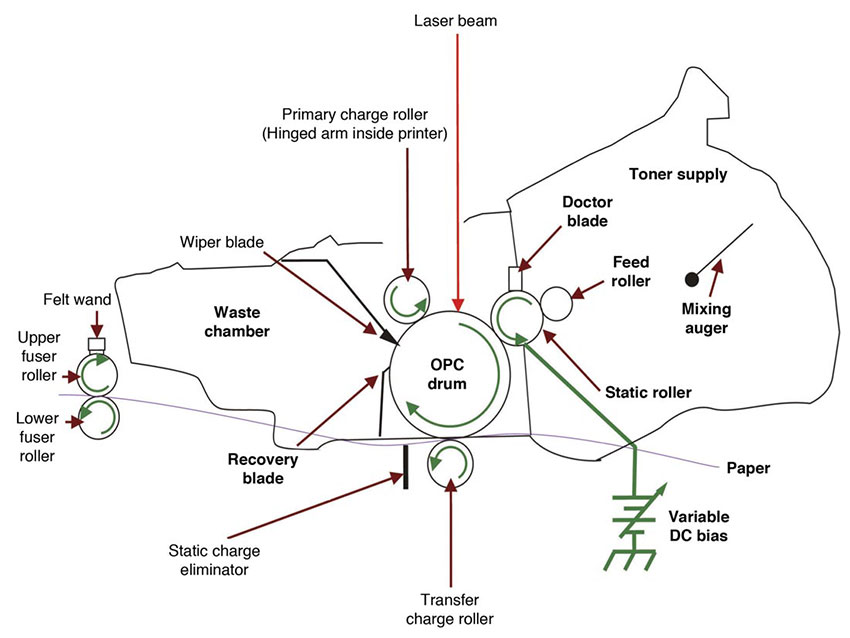
The printing process of the non-magnetic toner cartridge is best shown step by step. First, the PCR places a negative DC voltage on the surface of the OPC drum, this is called conditioning. Printer’s intensity setting then allows you to control the amount of the placed voltage.
The second step, the imaging section, is when the “scanner” or the rotating mirror is being fired by a laser beam. And then the beam is reflecting on a set of lenses, while the mirror rotates. And then the beam hits the surface of the drum and leaves the electrostatic image on it. The OPC drum makes about three revolutions per each printed page.
The third step, that is sometimes called the developing stage, is when your image is being developed on the surface of the drum by the supply chamber (developing section), where the toner particles are stored. The stationary magnet that is placed inside of the sleeve is holding the toner and the supplied DC bias voltage. You control this DC bias voltage by the printer intensity setting, and this voltage is controlling the amount of attracted toner. The print density is increased or decreased after that. First, the feed mechanism feeds toner to the developing roller. Usually this feed mechanism is a open-cell foam roler. There’s a metal doctor blade to control the amount of the toner that is on the surface of the developer roller, and to keep the certain amount permanently, it uses pressure. And when the laser exposed areas of the drum reach the developer roller, particles of the toner are attracted to the surface of the drum because the toner is charged with the opposite voltage potentials in contrast with laser exposed surface. Then, this image is transferred to the paper, and by passing under the drum, the transfer charging roller places positive charge on the back side of your print. This positive charge keeps negatively charged toner pieces attracted to the paper page. Since the diameter of the drum is small and your paper is stiff enough, paper will peel off the drum easily. The eliminator of the static charge weakens the attraction between the paper that is positively charged and the surface of the drum that is negatively charged. This will prevent the thin paper from wrapping around the OPC drum. Then, the fuser assembly fuses image on to the surface of the paper. The fuser assembly is comprised of the two halves, the lower and the upper fuser rollers. The paper sheet is then passed through the soft rubber roller that presses the paper up to the upper heated roller, which melts the toner into the paper sheet. This upper heated roller is a hard, Teflon roller, that is being cleaned by a felt wand.
The fourth step, is the cleaning of the OPC drum. Usually, only 90% of the toner is reaching the paper during printing. The remaining 10%of the toner that is on the surface of the OPC drum is cleaned off the drum by the wiper blade, while the drum rotates during the printing process. After that, the cleaned off toner is transferred to the waste chamber by the recovery blade, and it is stored there after.
The fifth step is carried by the PCR. When you’re done printing, the PCR will place the AC voltage on the surface of the drum, and that will remove any charge that is left on the surface of the drum. At the end of the cycle, the PCR is ready to condition the OPC drum with the DC signal, and the cycle may be started once again.
COMPONENTS OF THE NON-MAGNETIC CARTRIDGE
Non-magnetic toner is used in non-magnetic one-component systems. There is almost no powdered iron in these toners. Some have no iron at all. Lexmark printers use mostly non-magnetic toner systems. The advantage of such a toner is how much it lets you print. 500 gramms of this toner will print approximately 20,000 pages, while 500 gramms of magnetic toner will deliver you not more than 10,000.
Developer roller. This roller is basically a metal shaft with rubber wrapped around it. On the outside it has conductive sleeve. Printer’s high-voltage power supply sends electrical signals to attract the toner to the roller. There’s nothing like magnets or anything inside, the toner is attracted only by those impulses.
Doctor blade. This part is controlling the amount of toner that is on the surface of the magnetic roller, when it presses the silicon rubber blade against the sleeve of the magnetic roller, the toner leftovers come off. Also, this helps to keep the toner statically charged, so it spreads evenly on the sleeve of the magnetic roller. There’s a metal doctor blade in the most part of non-magnetic toner cartridges.
PCR. There are two main functions the primary charge roller has. First, it is applying a DC signal to the drum’s surface, so the printer laser is able to print on the surface. Second, it is applying an AC signal to the drum after printing, so any residual charges that were left on the surface of the drum are removed. Many non-magnetic cartridge machines have the PCR already installed in the printer, but not in the cartridge itself.
Drum. Those drum which are used in disposable cartridges are called organic photoconductors (OPC). This notion refers to the type of chemicals which were used for aluminum tube coating, the base of the drum. All drums are sensitive to light. Usually there are three layers of coating on the drum. The first layer is insulator, the second layer is reactive, it reacts to the light, and the last one is a protective layer. For how long your drum will last, depends on this last, protective, layer.
Adapted from http://www.uninetimaging.com/