Throughout the years we have provided lots of information about cartridges and printing, which we have found in different sources like service and training manuals from original equipment manufacturers, patents and more. Almost everything that we’ve found we gave to you, but, nevertheless, there are things that haven’t been mentioned. If you want to remanufacture your cartridge it is not necessary for you to know the cartridge theory, but if there’s a problem you want to troubleshoot then you’ll take advantage of knowing the theory. If you are able to find and repair a problem with your new cartridge fast and right, it is invaluable.
We have separated all of the cartridges in six different categories:
- Magnetic toner
- Non-magnetic toner
- Non-magnetic single-pass control toner
- Non-magnetic Carousel color toner
- Brother HL-1240 toner
- Dual-component systems
You may find here specific points for certain cartridges, as well as general broad information about them. Both ways, this information will help you next time you will confront any new problems with your printer. Although, the cartridges and printers are very fast and constantly developing, the basis of them has slightly changed from the very beginning. The greatest change that I can recall in my memory is when Canon and HP started using charge rollers instead of corona wires. Besides that the toner particles got smaller, melt points got lower, less chargers are needed, chips have been added, but other than that, cartridges are all the same as they were first time introduced. Unfortunately it is impossible to predict what will happen next, but, taking into account what I’ve seen and used before, I can say that this trend will continue for some time more.
MAGNETIC TONER
To describe the process of printing with magnetic toner cartridge, I should better explain it step by step. The first step is placing the uniform negative DC bias voltage on the surface of the OPC drum by the PCR (primary charging roller). Intensity setting on the printer is controlling the amount of placed voltage. This process is called “conditioning”.
The second step, that is sometimes called the imaging section, is when the “scanner” or the rotating mirror is being fired by a laser beam. And then the beam is reflecting on a set of lenses, while the mirror rotates. And then the beam hits the surface of the drum and leaves the electrostatic image on it. The OPC drum makes about three revolutions per each printed page.
The third step, that is called the developing stage, is when your image is being developed on the surface of the drum by the supply chamber (developing section), where the toner particles are stored. The stationary magnet that is placed inside of the sleeve is holding the toner and the supplied DC bias voltage. You control this DC bias voltage by the printer intensity setting, and this voltage is controlling the amount of attracted toner. The print density is increased or decreased after that. Printer intensity setting is controlling both primary charge roller and the magnetic roller voltages. There’s a rubber doctor blade to control the amount of the toner that is on the surface of the magnetic roller sleeve, and to keep the certain amount permanently, it uses pressure. Also, the static charge on the toner is caused by this blade, and that’s why the toner coating is spread on the surface evenly and easily transferred to the OPC drum. At the same time, the AC signal is placed on the sleeve of the magnetic roller. And using this AC signal the attraction of toner to the magnetic roller is decreased, when the repelling action of toner is increased for those areas of the drum which were not exposed to a laser. Using this AC signal you improve the contrast and the density of the toner on a print. And when the laser exposed areas of the drum reach the magnetic roller, particles of the toner are attracted to the surface of the drum because the toner is charged with the opposite voltage potentials in contrast with laser exposed surface.
The fourth step, that is called transfer stage, is when the toner image is being transferred to the paper, when it goes below the drum by the charge roller, which is placing the positive charge on the back surface of the paper. This positive charge keeps negatively charged toner pieces attracted to the paper page. Since the diameter of the drum is small and your paper is stiff enough, paper will peel off the drum easily.
The fifth step, the separation stage, is when the paper goes off the drum. The eliminator of the static charge weakens the attraction between the paper that is positively charged and the surface of the drum that is negatively charged. This will prevent the paper from wrapping around the OPC drum and also will prevent the toner from dropout onto the paper surface when the temperature is low and humidity is high.
The sixth step, the fusing stage, is when the fuser assembly fuses image on to the surface of the paper. The fuser assembly is comprised of the two halves, the lower and the upper fuser rollers. The paper sheet then passes through the soft rubber roller that presses the paper up to the upper heated fusing element. This upper heating element could be either a roller that is coated with Teflon and halogen lamp inside of it, or a Teflon sleeve with ceramic heating element. All the new models have the ceramic heating elements because of the lower energy usage, and all of them are instant-on which makes the printing process faster.
The seventh step, the drum cleaning stage, is cleaning of the OPC drum. Usually, only 95% of the toner is reaching the paper during printing. The remaining 5%of the toner that is on the surface of the OPC drum is cleaned off the drum by the wiper blade, while the drum rotates during the printing process. After that, the cleaned off toner is transferred to the waste chamber by the recovery blade, and it is stored there after. When you’re done printing, the PCR will place the AC voltage on the surface of the drum, and that will remove any charge that is left on the surface of the drum. At the end of the cycle, the PCR is ready to condition the OPC drum with the negative DC bias, and the cycle may be started once again.
In older system, instead of the PCR and the transfer roller there were transfer corona wire and the PCW (primary corona wire). These wires are designed to do the same tasks, but they require much more power than the new ones. Primary charge roller system is better, since the erase lamps from old style laser printers were replaced, printers don’t generate ozone, and of course that they consume less energy than the old corona wires did.
COMPONENTS OF THE MAGNETIC TONER CARTRIDGE
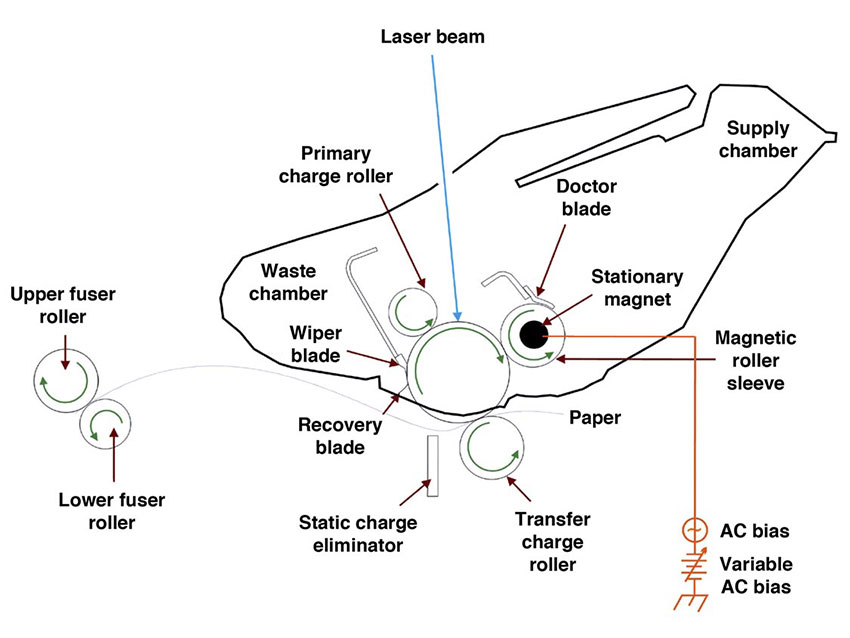
Magnetic toner. It is the combination of powered iron, carbon, and other components that control the charge and the flow of the toner. All HP and Canon printers are using this kind of toner.
Magnetic roller. This component is the most important one, since it is responsible for solid print density. While rotating, the magnetic roller attracts toner by the permanent magnet that is installed inside the sleeve, and by electrical signal from the printer’s high voltage power supply.
Doctor blade. This part is controlling the amount of toner that is on the surface of the magnetic roller, when it presses the silicon rubber blade against the sleeve of the magnetic roller, the toner leftovers come off. Also, this helps to keep the toner statically charged, so it spreads evenly on the sleeve of the magnetic roller.
PCR. There are two main functions the primary charge roller has. First, it is applying a DC signal to the drum’s surface, so the printer laser is able to print on the surface. Second, it is applying an AC signal to the drum after printing, so any residual charges that were left on the surface of the drum are removed.
Drum. Those drum which are used in disposable cartridges are called organic photoconductors (OPC). This notion refers to the type of chemicals which were used for aluminum tube coating, the base of the drum. All drums are sensitive to light. Usually there are three layers of coating on the drum. The first layer is insulator, the second layer is reactive, it reacts to the light, and the last one is a protective layer. For how long your drum will last, depends on this last, protective, layer.
Wiper blade. There’s a rubber edge on the wiper blade that cleans all of the toner that did not reach the paper. This blade slides right on the drum surface, so it is one of the main reasons of the drum wear.
Recovery blade. This blade is made from mylar and is very thin, it guides the wiped off toner to the chamber for wasted toner. Should there be no recovery blade, or maybe it is damaged, the toner would spill right on the printed pages.
Waste chamber. It is the place where all of the wasted toner is stored. This part of the cartridge usually contains the drum, charging roller, recovery and wiper blades.
Supply chamber. It is the place for the new toner that is not yet used. This part of the cartridge contains the doctor blade and the magnetic roller assembly.
Adapted from http://www.uninetimaging.com/