This article will mainly describe the Brother TN-460, but also it is covering other Brother drum cartridges. The toner of this cartridge is also non-magnetic, but since the working principle is very unique, Brother will have a separate article here. Also, this article will give you some tips on how to troubleshoot your cartridge. Nevertheless, the theory for all Brother cartridges is the same, the toner for each particular model is different. Using the toner from one cartridge with another, will give you quite different results. So, you need to be always sure that your current toner suits your cartridge.
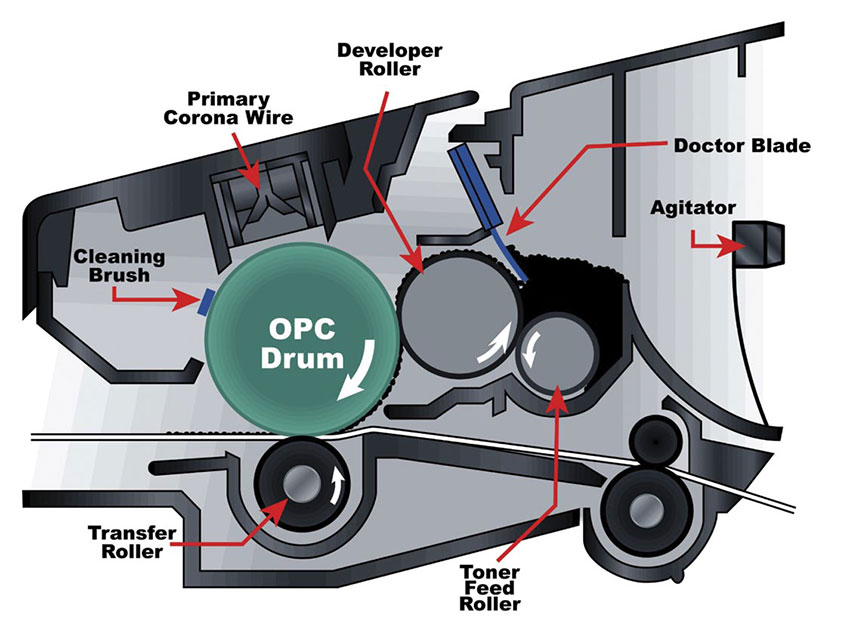
Why this system is so unique? Here’s a number of reasons: wasted toner goes back to the supply reservoir, there’s no wiper blade to clean the toner leftovers, the cartridge uses a cleaning felt instead, and the last but not least – it uses primary corona wire as well as the transfer roller. There’s a built in cleaner in the primary corona wire. When not in use, it is located on the left side of the cartridge, cleaner’s home position.
The engine is also unique, because the developer roller is touching the drum. Unlike other cartridges, there’s no air gap between them. To put it simply, “jumping technology” is not used by the engine while transferring the image from the roller to the drum. Although, this little thing is not changing the way you recycle your cartridge, you may confront some issues, should you clean the OPC and toner cartridges poorly. If you want to clean this kind of cartridge properly, you should read the article carefully and forget what you already know about cleaning cartridges, since this process will be quite different.
When your cartridge is done, and is going to be refilled, first thing to do is to remove any toner leftovers from the supply chamber (there’s approximately 80 grams of toner) before filling the new toner in. Not cleaning the toner leftovers out will cause background on your prints. In this case, the toner cartridge will be contaminated, and this in turn will cause the cleaning section to be contaminated, and that will contaminate the cartridge all over again. These 80 grams of toner are basically a mix of a new and old toners. But there’s not enough toner to work with. Remember, that your cartridge might be damaged because of not cleaning the toner leftovers out.
There are a cleaning brush and a recovery blade in the cleaning section. During the printing two different charges are placed on the brush. The first one is to attract any toner off the drum, and the second one is to repel any toner off the brush, so it goes back onto the drum’s surface, and after that is transferred to the toner cartridge back. This is not interfering with the printing process, since it is done in a timing sequence. You will have a background on your print in case the brush is contaminated with bad toner that does not receiving the proper charge and the brush is not able to clean itself. At any time, the cleaning brush that is working properly won’t have much toner stick to it. When the brush is contaminated, the amount of toner on it will only get bigger and bigger, what will cause the condition of the cartridge to get worse. And the main reason for that to happen is the absence of the waste chamber. All the toner that has been used is transferred back to the toner cartridge.
Since there’s no gap between the drum and the developer roller, all of the wasted toner gets back to the toner cartridge supply. As mentioned earlier, if you print using the bad toner cartridge, you will contaminate your drum unit. So, even changing the toner with a new OEM cartridge won’t help, since some of the bad toner will be transferred to the new cartridge by the drum unit, and that is, again, the reason of having a background. You will have both cartridges contaminated. So, when you see that you are having a background on your prints, that’s the sign that you need to clean out both cartridges.
80 grams of toner is below the minimum amount of toner that can receive a proper charge. When your device shows you that the toner needs to be changed, that means that the toner left won’t charge up to the proper level, what will cause having a background on your prints. When the toner cartridge is almost empty, your device will try to keep the charge level up with toner that is still in the chamber. So, this permanent charging will prevent backgrounding when the cartridge is almost empty. And when there’s not enough toner to properly charge it, you will be notified to “Change toner”. At this point, the cartridge is still printing just fine. But if you take the cartridge out for some period of time and then put it back in having done nothing to it, you will have the backgrounding.
WHAT DO YOU DO WITH ALL OF THIS INFORMATION?
- You need to be sure that the supply chamber of the cartridge is completely cleaned by the cartridge technicians. The best way to clean it is by using the compressed air.
- Should technicians forget to do so, and you are having backgounding, the toner needs to be cleaned out again and new one is filled. After that the drum unit needs to be disassembled and cleaned, paying greater attention to the cleaning brush area. It is not hard thing to do, but still necessary when the unit is contaminated.
- Developer roller should be cleaned by the dedicated chemicals. For proper printing, the blue-white film that might have built up on the surface of the roller needs to be removed. For this purpose you should use only Brother developer roller cleaner. It may seem that the roller have been cleaned after using some other chemicals, but a chemical reaction may have place after that, and your device will be damaged.
- When the drum unit is being assembled back, the drum may be cleaned with the alcohol, but no other chemicals should be used. The same thing with the cleaning brush. There’s a conductive coating on the brush and should any solvents get on it, it will be removed. Should you remove the conductive coating, you won’t be able to use your cartridge ever again.
TROUBLESHOOTING YOUR CARTRIDGE
BACKGROUNDING
It is the most common problem these cartridges have. There are 3 main reasons for that. The first one is the contaminated toner. If there were some old toner left in the cartridge, you might have a shaded background over a printed page. Also, it may happen because of the cleaning brush that is contaminated, as a result of the bad toner cartridge.
Maybe you have worn out your developer roller, and it started pulling too much toner, what causes backgrounding. Usually, this happens to cartridges that have been refilled for a few times already. Normal developer roller looks mottled, and has a smooth texture. Should there be any cracks, lines, or should anything look not right for you, do not use this cartridge.
The other thing that may cause backgrounding is switching to a different toner. Not every toner works with another. Since there’s always some toner left on the cleaning brush. Most part of toners will work over OEM, but definitely not all of them will work over another toner. If your cartridge works just fine at home, but when you’re using it in another device it backgrounds, than it means that the drum unit is not working, or that there was some other toner used before yours. Make sure to always ask a shop assistant whether your toner is able to work with other toner brands.
CLICKING
There is a number of gears with fine teeth on the left side of your cartridge. So, should any toner get on those teeth and you won’t clean it off after, it may cause one of them to break, and you will have clicking sound coming out of the cartridge. An easy way to prevent that, is by simply covering the gears with your hand while blowing the cartridge with compressed air and cleaning it, and doing the same thing when filling the new toner in. That way your gears will remain clean. Should they get any toner on their surface, no problem, use alcohol to clean both shafts and gears, and don’t forget to lubricate them afterwards. Also, the clicking may appear because of the not appropriate toner being used. The particles of the other toner may be not uniform, and that will prevent the smooth toner flow, what in turn will cause the mixing auger to bind and break the tooth.
TONER SPOTS ON THE RIGHT SIDE OF THE PAGE
That’s another common problem. On the right side of the developer roller, there’s a small clip, and that clip is holding only on double-sided tape. Sometimes it happens that this clip falls off. This happens to 35% of cartridge users. This clip is keeping the toner from gathering up on the edge of the developing roller. If there’s no clip, the toner is gathering up till the moment when there’s too much and it starts to fall off. And that causes the speckled vertical spots. There’s also a clip on the left side. But that one is permanent and won’t fall off. If you need new clips, you can buy them.
BLACK VERTICAL LINES
The reason for that is usually a dirty PCW (primary corona wire). Or it may be the blue corona wire that is not properly installed on the left side of the cartridge.
GRAY VERTICAL LINES AT THE BOTTOM OF THE PAGE
The reason for that is usually a groove in the developer roller. To solve this issue you need to repair and recoat your roller, or simply replace it with a new one. You may try anything that suits you best.
LIGHT PRINT
The reason for that is worn out or dirty transfer roller. It is located inside of the cartridge.
WHITE OR BLACK HORIZONTAL LINES
Usually you have black lines when the toner is built up somewhere. And white lines are caused by the dead spots or roller contaminations. If lines appear every 94mm. it means that the drum is dirty or bad. If the distance between them is 39mm it means that the developer roller in cartridge is dirty or bad.
COMPLETELY BLACK PAGES
Usually happens because of the poor drum ground contact.
THIN BLACK LINES DOWN THE PRINTED PAGE
Your drum is scratched.
BLACK SPOTS REPAETING EVERY 94mm
There’s something stuck on the surface of the drum, or your drum is bad.
Adapted from http://www.uninetimaging.com/