Dual-component systems are analog copiers that have a source of light. In copiers it is an exposure lamp. There are two different types of cartridges used in this kind of machines. First one includes both toner and developer in a single unit, and the second type is where the developer is separated from the toner. Since this technology is not new, there are quite a few variations of it. But still, the theory is all the same for each of those.
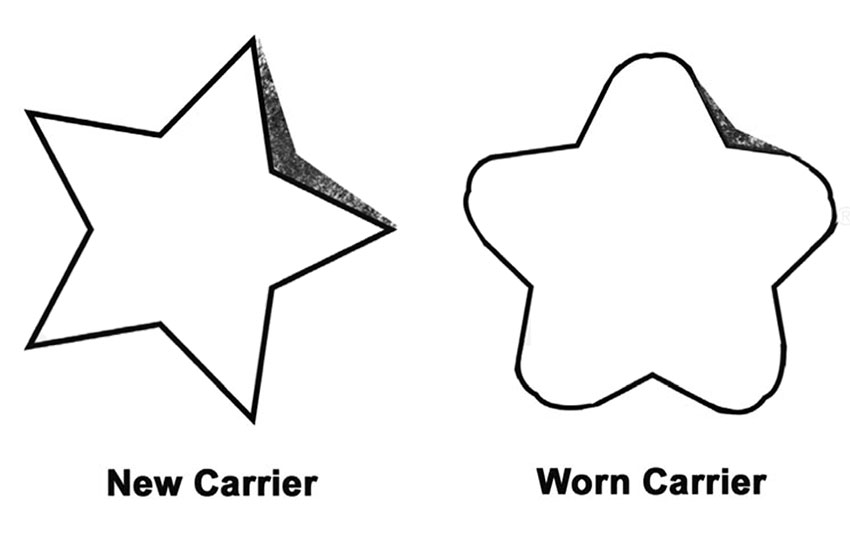
The developer has two components: toner and carrier. During the manufacturing of the developer, specific amounts of carrier and toner are mixed. The developer always stays inside of the cartridge, while everything works properly. The developer picks up the toner that should be transferred to the drum and after that it goes back to the developer section to start the process all over again. There’s a sensor located in the cartridge that controls the proportions of the toner and developer. The job of the sensor is to identify the specific amounts of both components mixed. When the sensor does not see appropriate amounts, it will make the machine to go back and bring more toner. This will continue until the task is fulfilled. And that’s why some preparation time is required when a new cartridge is installed in device of such kind. When the machine has cycled for a few times you will see the “ready” LED. When you are using a new developer, the star has a lot of place for a toner to sit on it. When using the cartridge, the star points will inevitably wear down because of the friction between the magnetic roller and toner. And when the points are worn, there’s less place left for the toner to sit. This is one of the reasons of having light prints. Moreover, should you let it be, the machine won’t ever show you a “ready” LED since the sensor won’t see the proper mixture. Depending on the carrier toughness, developer can last two cycles or more.
The first stage in this process begins by pressing a “start” button. Exposure lamp lights up and the scanner start to move across the glass. Primary corona wire charges the OPC drum. The charge that gets to the drum is approximately 800VDC. Exposure lamp light reflects off the document you are copying and then this light is going through the number of lenses and mirrors to reach the OPC drum. When copying in normal copy mode, the speed of the drum and the scanner is the same. When the reflected light strikes the drum, white areas of your document are discharged. Those areas which are not reflecting any light will remain charged. The area that remains charged is called latent image, it is the mirrored image of the original document you’re copying. Remember, that digital copiers or laser printers are working in an opposite way. They charge the white, non-printed areas of your print instead of black ones. And that is the reason of using positive toner system instead of the negative one (like in laser printers).
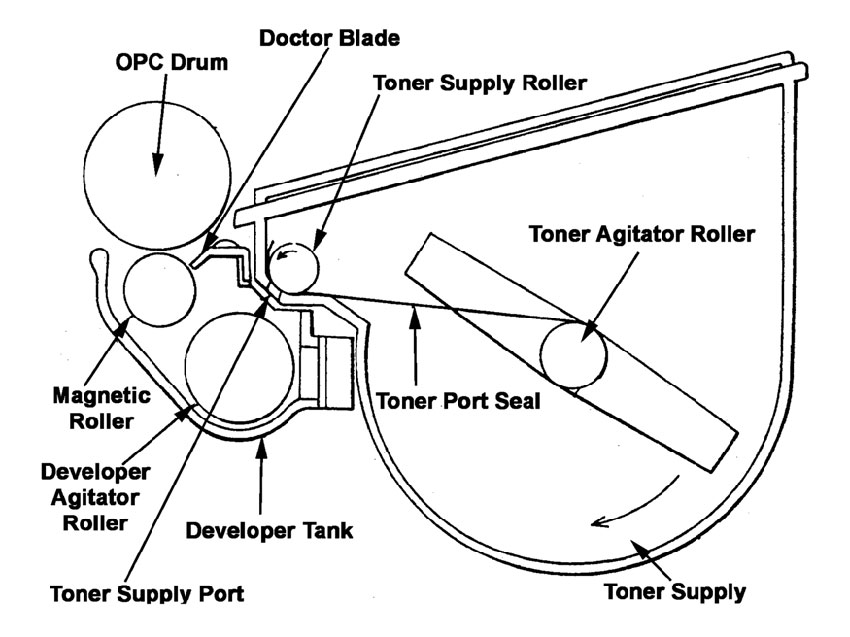
The second stage. When the drum turns, magnetic roller is also turning inside of the cartridge. Toner is then attracted to the charged areas of the drum. The attraction is enough to draw the toner off, but not enough to draw the developer off. Toner agitator then feds new toner to the developer section by pushing it to the toner supply roller. The toner is then pushed out the toner feed port and mixed with the developer. When the proper mixture is done, the sensor sends a signal for the agitator and supply rollers to stop turning. Now the paper is ready to meet the drum. The paper is charged with DC charge of 5000V and the image is ready to be transferred onto the paper. There’s a residual charge on the drum that may cause the paper to wrap around it. To prevent that, separation belt is used. It can be installed either in the machine or in the cartridge itself.
The third stage is when the fuser assembly fuses image on to the surface of the paper. The fuser assembly is comprised of the two halves, the lower and the upper fuser rollers. The paper sheet is then passed through the soft rubber roller that presses the paper up to the upper heated roller, which melts the toner into the paper sheet. The upper roller is a hard, Teflon roller and it is usually heated by a halogen lamp.
The fourth stage, is the cleaning of the OPC drum. Usually, only 90% of the toner is reaching the paper during printing. The remaining 10% of the toner that is on the surface of the OPC drum is cleaned off the drum by the wiper blade. After that, the cleaned off toner is transferred to the waste chamber by the recovery blade, and it is stored there after. Not all of the drum cartridges have a waste storage reservoir. The toner is moved away from the wiper blade by augers and placed into the toner cartridge waste chamber.
The process is then completed by erase lamps. Using the red light it kills any residual charges on the surface of the OPC drum. After that, the drum is ready to be conditioned by the primary corona wire, and the process may be started all over again. If one of these erase lamps doesn’t work, you will have gray vertical lies on your page. In the first stage the speed of the scanner and drum was the same. But when you are printing in enlargement or reduction mode, the speed of the scanner is different and different set of lenses are used to produce the result that you need.
COMPONENTS OF DUAL-COMPONENT CARTRIDGE
Developer. The developer is a mixture of toner and metal filings. It transfers the toner to the drum and goes back to pick up more. The developer is always in the unit, it simply wears out.
Magnetic roller. This component is the most important one, since it is responsible for solid print density. While rotating, the magnetic roller attracts toner by the permanent magnet that is installed inside the sleeve, and by electrical signal from the printer’s high voltage power supply.
Toner low sensor. The job of the sensor is to identify the specific amounts of the developer and toner components mixed. When the sensor does not see appropriate amounts, it will ask the machine to go back and bring more toner. This will continue until the task is fulfilled. And that’s why some preparation time is required when a new cartridge is installed in device of such kind. Static charge can easily damage this sensor. Also it may be damaged while cleaning the cartridge. So it is better to use compressed air to blow the cartridge and avoid damaging the sensor.
Toner supply port. If your sensor is damaged, then you will probably have too much toner attracted to the developer, what will cause overtoning or backgrounding.
Doctor blade. This part is regulating the amount of toner that is transferred to the developer section. When the proper mixture is done, the sensor sends a signal for the agitator and supply rollers to stop turning. The port is then closed by the toner port seal to prevent extra toner from reaching the developer area.
Primary corona wire. This part is regulating the amount of toner on the magnetic roller. That is done by the metal blade placed on a certain distance from the sleeve of the magnetic roller.
Transfer corona wire. This corona wire is applying a DC signal of 5000V to the surface of the drum and because of that the reflected light is able to discharge non-printed areas of the document you’re copying. The paper is also charged with a DC signal to draw the latent image from the drum to the paper. The static charge is holding the image until it is melted into the paper.
Drum. Those drums which are used in disposable cartridges are called organic photoconductors (OPC). This notion refers to the type of chemicals which were used for aluminum tube coating, the base of the drum. All drums are sensitive to light. Usually there are three layers of coating on the drum. The first layer is insulator, the second layer is reactive, it reacts to the light, and the last one is a protective layer. For how long your drum will last, depends on this last, protective, layer.
Wiper blade. There’s a rubber edge on the wiper blade that cleans all of the toner that did not reach the paper. This blade slides right on the drum surface, so it is one of the main reasons of the drum wear.
Recovery blade. This blade is made from mylar and is very thin, it guides the wiped off toner to the chamber for wasted toner. Should there be no recovery blade, or maybe it is damaged, the toner would spill right on the printed pages.
Waste chamber. It is the place for wasted toner to be stored. This chamber can be located separately in the toner/developer cartridge or in the machine itself, or inside of the drum cartridge.
Supply chamber. Supply chamber contains: new toner, magnetic roller assembly, doctor blade, feed rollers and the developer.
Adapted from http://www.uninetimaging.com/