The instruction is given as it is. Everything you do is at your own risk. Be attentive and careful! If something isn’t certain enough, leave your comments below, we’ll try to help you.
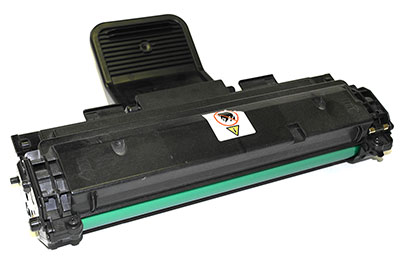 As it is given in the title of this article, the cartridge that we will be refilling, suits a number of printers and multifunction devices, such as Samsung ML-1610/1615/2010/2015/2510/2570/2571, SCX-4321/4521, Xerox Phaser 3117, 3122, 3124, 3125, Xerox WorkCentre PE220, and also their more advanced brothers Samsung SCX-4650/4655.
The difference of cartridges in these devices concludes a few improvements, the presence or the absence of a chip or a protective device. All these cartridges are refilled with the same toner, for example Samsung ML-1210 or similar. As to the quality of the toner, you better take an advice from a shop assistant, since there is a great variety of different toners, and it is hard to highlight something particular.
So, let’s begin! Prepare your workplace by covering it with a paper or some kind of a film. We don’t need many tools here: cross screwdriver, flat screwdriver, a piece of cotton fabric, business card or a piece of plastic.
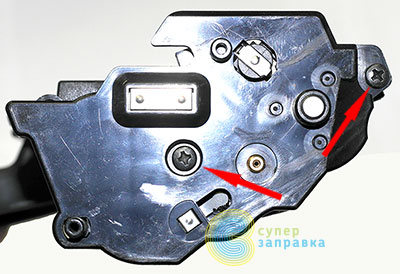
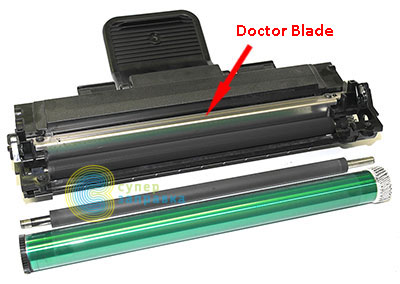
Twist off two screws, which are highlighted with red arrows. Carefully pull the lid up, there’s wasted toner and you might get dirty. After the lid is off, take it aside and shake all of the wasted toner out. Those who want to do everything really nice need to take off the ink fountain blade (look at the next picture), and clean all of the toner leftovers out, but usually there’s no need to do that. Also, pay attention to the edge of the ink fountain blade; try not to touch it and not to clean it, if the cartridge is not completely “finished”, then the blade is in pretty good condition and there’s no need to clean it. If you did clean the edge of the blade, you need to powder it with the toner or a special talcum. If you neglect to do so, the ink fountain blade may be “twisted” and ripped apart from its base, which will cause the breakage of your cartridge.
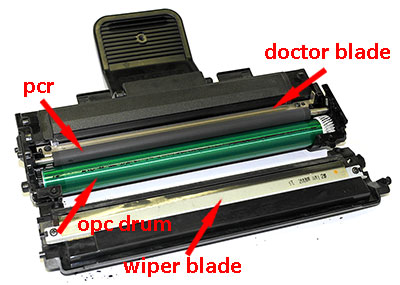
 Now let’s take a look at the cartridge equipment. It consists of two halves. First one is the wasted toner half. It represents a wasted toner reservoir. During printing, not all of the toner is transferred from the OPC drum to the paper; the certain part of this toner is scraped out to this reservoir by the ink fountain blade. The second half is for the toner, with the help of which the printer is printing. There are also: charging roller, OPC drum, blade in developing unit and other auxiliary mechanisms.
 Let’s start disassembling the cartridge. First, unscrew cartridge side lids screws. Further disassembling depends on what you want to do with your cartridge. You may disassemble it totally, to replace the OPC drum or to perform extensive internal cleaning, or you may just disassemble it partially. Both ways, we need to end up with the satisfying result. After the screws are out, take off the side lids. Pay attention. Under the side lid, the opposite to the one shown on the picture, there is gearbox gear, be careful not to lose it.
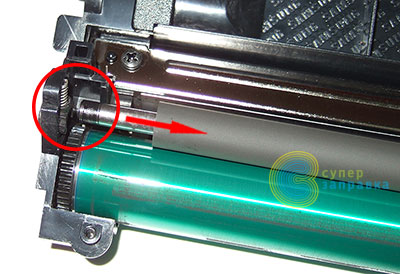
 Place the OPC drum half of the cartridge with the handle against you. Now, move the charging roller right and take it out. Pay attention to the black grease on the left side of the roller. This is the electrical joint compound, and you better not remove it. Next, carefully take out the OPC drum and put it somewhere, where you won’t accidentally damage it.
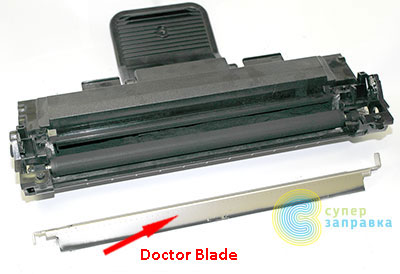
 You can see the cartridge without the OPC drum here, and the blade is marked with the arrow, so the blade is our goal here. Blade in developing unit is a flexible metal plate, which tightly contacts the developing roller and designed to align and dose the toner. Due to this blade, the toner spreads on the roller’s surface evenly. What is it all about? That’s what! Main Samsung cartridges malfunctions involve this blade, it may cause pale printing or whitish strips on your image. The thing is, the toner pieces stick to the edge of the blade and prevent smoothing the toner out on the developing roller. To escape these defects we need to perform certain manipulations, so let’s look at them in the following pictures.
 To clean the blade you may take advantage of the following method. Take thin pressboard or a piece of plastic, something like a business card, or a plastic card and inject it in between the blade and the developing roller. This picture shows the process poorly, you should better place the cartridge side lids back, since the developing roller won’t be pressed down to the blade as tight. And then, by moving the card along the roller, clean the edge of the blade. If you’re not about to replace the OPC drum and take the blade out, then it is not necessary to take the gear side lid off, it will be convenient to scroll the OPC drum holding it by the gear wheel after the cleaning the blade, to look whether circle lines will or will not appear on the developing roller. If they are, then you need to clean the roller with the card one more time. Small advice, rotate the developing roller clockwise, when looking at it from the toner refilling cap side.
 This picture shows the enlarged view of how to place the “scrapper” in between the developing roller and the blade. The point of this action is to slide the edge of the “scrapper” along the edge of the blade and clean the toner growth off.
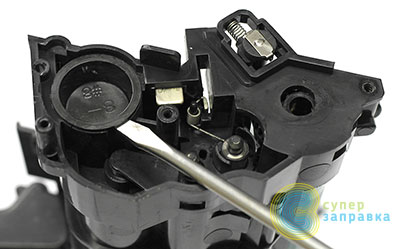
 Those of you, who want to make a radical cleaning, you need to take out the blade. Also pay attention to the spring on the left side of the blade. Unscrew the blade screws and take it out.
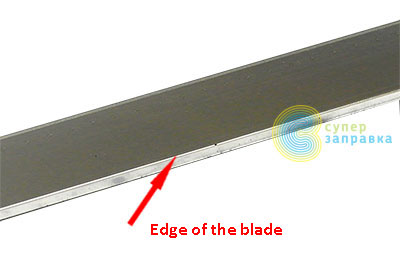
 So, here is the edge of the blade that needs to be cleaned. To clean it you may use the “scrapper” or any other available material that is not too hard, so you won’t damage the blade. You may also use some cleaning liquids, like pure benzine or something similar.
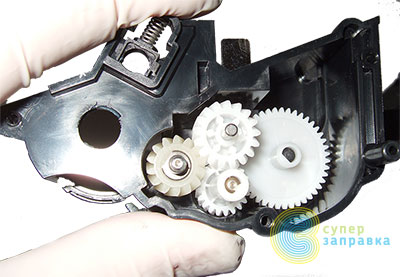
 Here you can see the position of gears in reductor. Should something fall out, and you happen to forget where and what was, you can use this picture to recreate everything back as it was.
 The final part of our instruction. You need to assemble the cartridge back. Install the blade, then the OPC drum. After that you need to install the previously cleaned charging roller. You may use different cleaning liquids here, as well as the tap water with soap. After the cleaning with tap water and soap, you need to let the roller dry well. Also consider the condition of the roller. If it is just fine, without any defects or visible deposit, you may simply clean it with a piece of rag. Remember about the grease on the roller.
After realization of preliminary assembling, let’s get to the refilling. Pry the cap up with your screwdriver and open it up. Next, flip the cartridge upside down and shake everything out of it. Also, you may use your screwdriver and by taping the cartridge with it, clean all the wasted toner leftovers out. If you have a toner vacuum cleaner or a cartridge cleaning station of your own, you better use them for this purpose.
 The easiest thing left! Take the toner can, give it a shake, and using your funnel, fill the cartridge with toner. Don’t forget to close up the cap. Now, place the side lid back and fasten the wasted toner tank. And the last but not the least, you need to rotate the cartridge drum, holding it by the gear, to make sure that the cartridge is not jamming. You should rotate it to the side of the wasted toner tank, counterclockwise (when looking at the drum’s axis on the side of the cartridge cap). Ta DA! The cartridge is refilled.
 A few words on chips and protective devices which are placed to prevent refilling of cartridges. There’s nothing complicated with protective devices. There’s an article on the website, where you can find detailed information about them. Chips are not as easy to deal with. If you are refilling the cartridges for old printers and multifunction device models, there should be no problems, since these chips are available and all you need is replace or reprogram them. It won’t do with new models, so you will need to jailbreak your device. In this case you won’t ever think about chips, and will refill your cartridges without any problems.